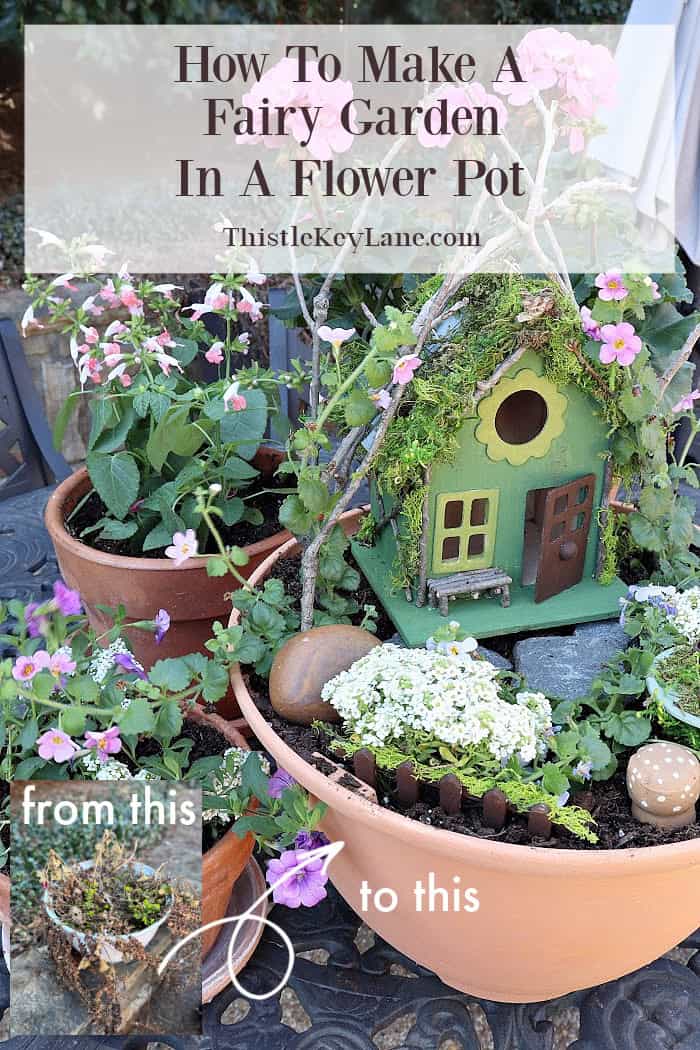
How To Make A Flower Pot Fairy Garden. See how to give an old flower pot a makeover fitting for an enchanted fairy garden. I will also show you how to repurpose a birdhouse for the perfect fairy retreat.
As an Amazon affiliate, I earn from qualifying purchases at no cost to you. My blog may contain affiliate links for your convenience. For more information please see my disclosure page.
March Handcrafted Society Challenge
Are you ready for the Handcrafted Society’s March challenge? I hope so, because we doing something a little different this month. If you are wondering what the Handcrafted Society is all about. Quite simply, it’s a group of bloggers who share a love for detail and craftsmanship.To see the HS project from last March, you can click here for my spring flower door baskets.
Instead of a specific medium, our challenge is to up-cycle something from the garden, plant shed or backyard. Sounds pretty interesting right? Be sure to check out all the links and photos at the end of my post to see what my friends are sharing. You won’t believe the creativity from this group!
How To Make A Flower Pot Fairy Garden
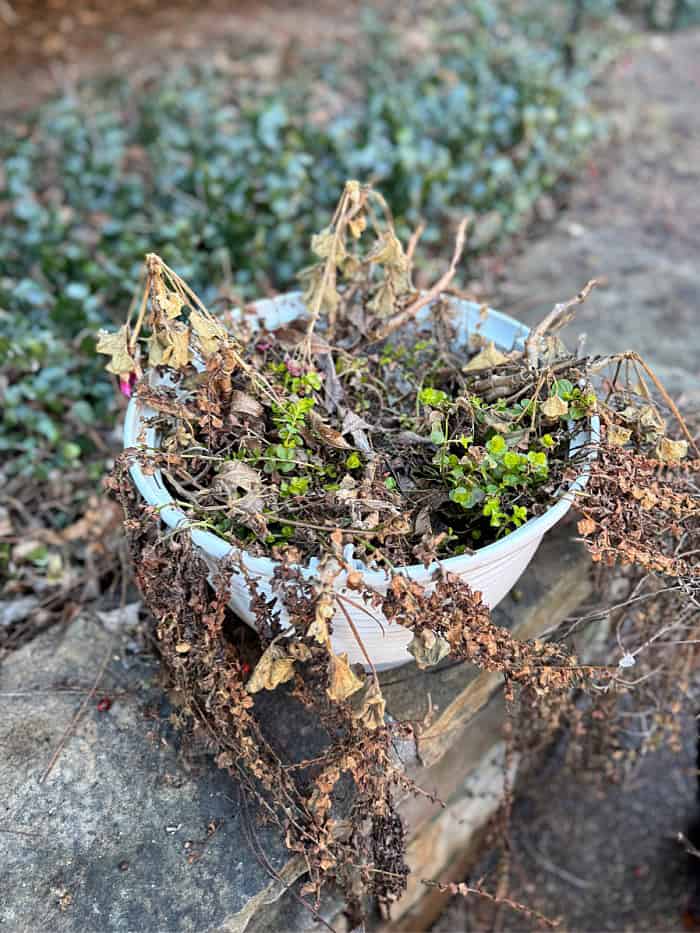
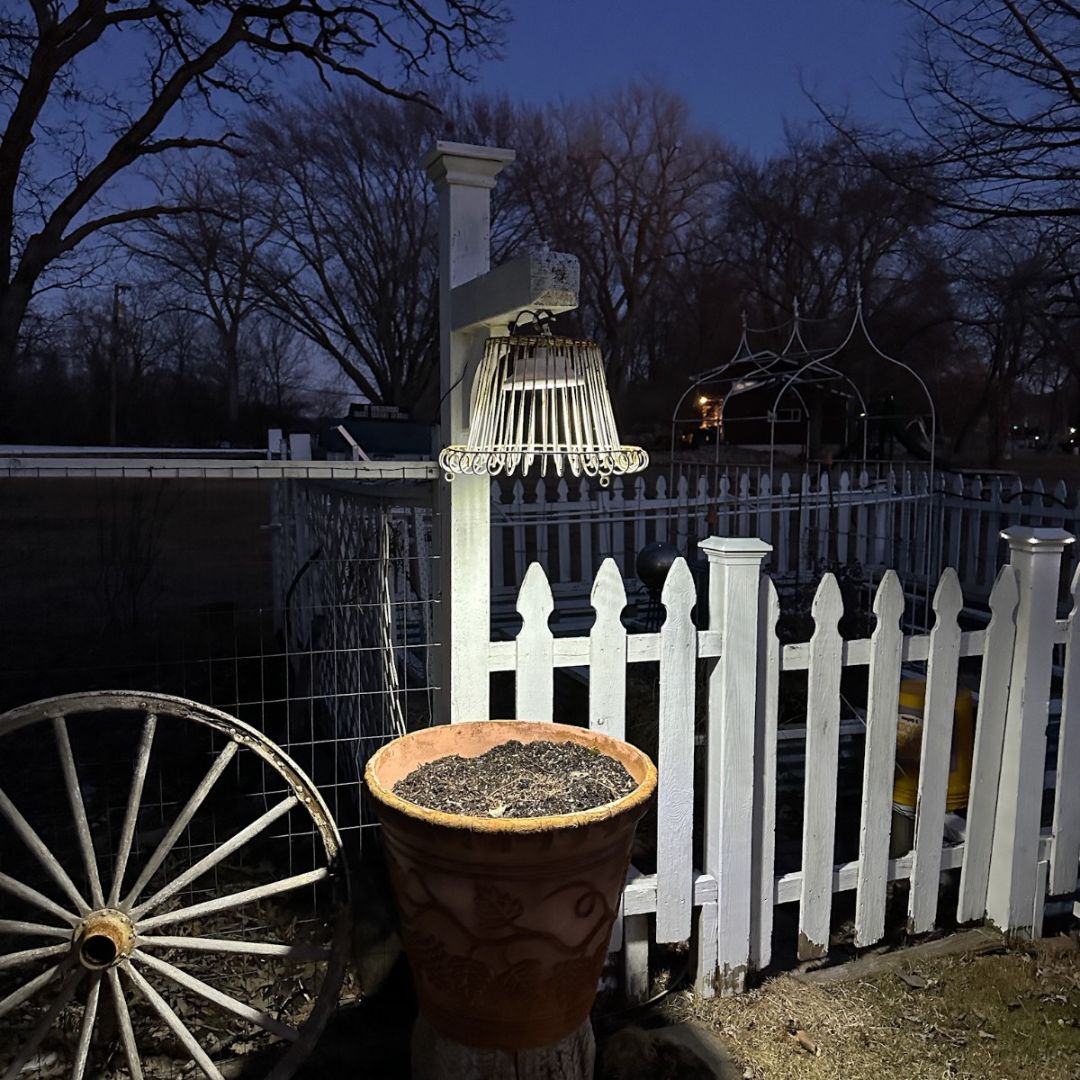
This month’s challenge encompasses so many possibilities. Think about all the things you might have collecting dust or rust, that could use a makeover or be recycled into something else. I have a flower pot that has seen better days, however the plant is coming back after winter. So my plan is to salvage the pot and the plant, at the same time create something fun for the grand littles. Here’s a list of supplies you might need to gather to make a flower pot fairy garden.
Supplies
- craft paint for the flower pot and fairy house
- small bird house
- craft or sponge brush
- preserved moss, Spanish moss
- glue gun and glue sticks
- things from the garden or yard such as sticks, tree bark, rocks
- nicknacks from around the house to make furniture (optional)
Flower Pot Makeover With Paint
Below you will see the condition before painting and removing all the dead stems. Then I applied textured paint to the outside and inner lip of the pot. I always have the best results with FolkArt Terra Cotta paint, and it works so well on all sorts of surfaces. Now I have container that blends in with my real terra cotta pots. Easy peasy! Check out my post Flower Pot Upcycle Project.

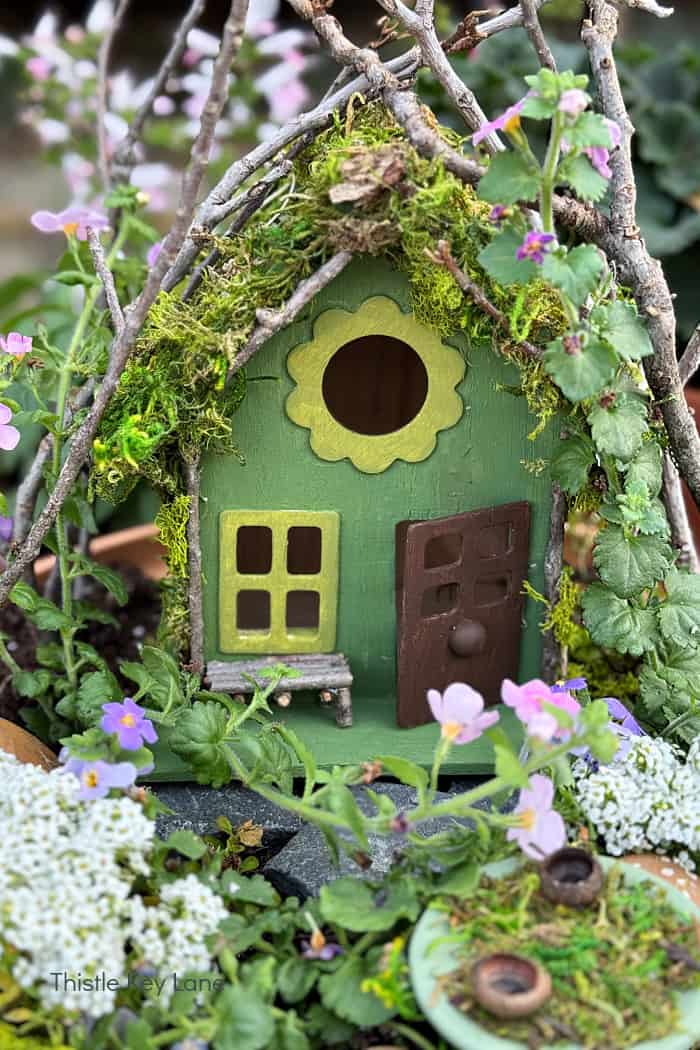
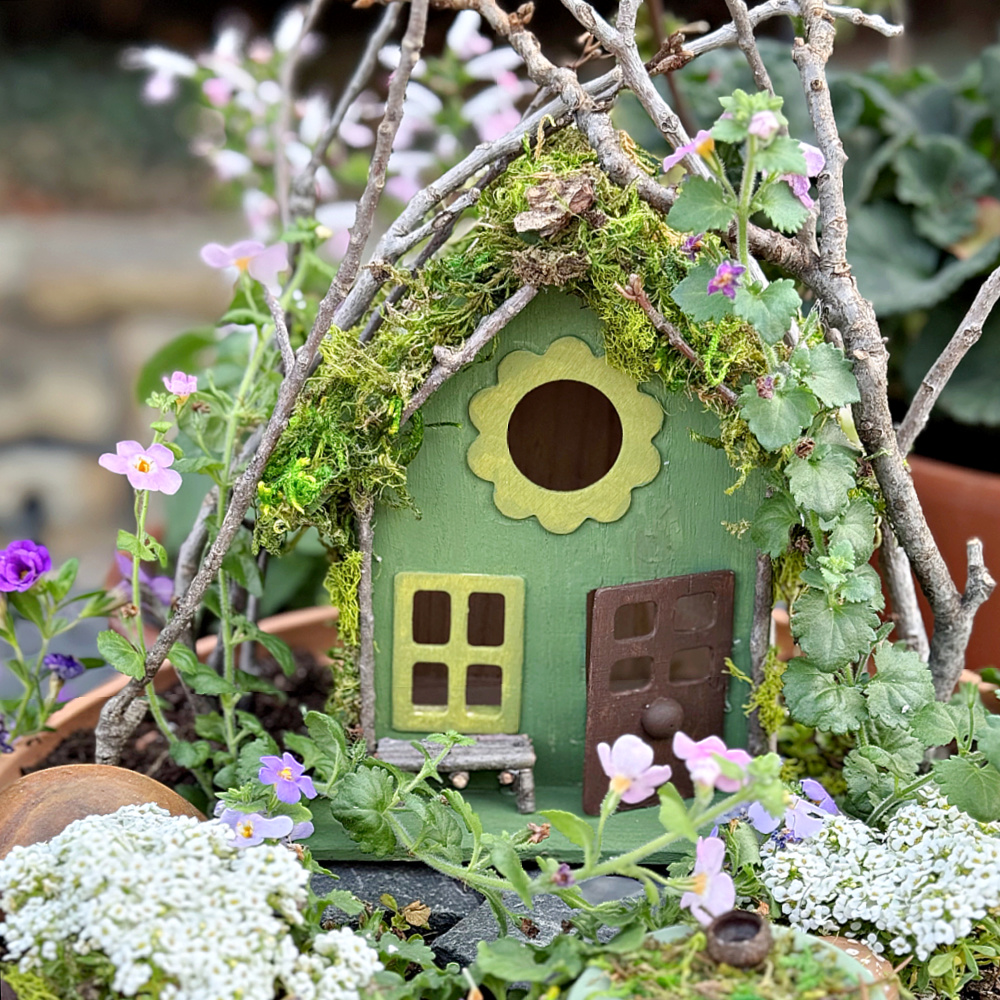
Creating A house for the Fairy Garden
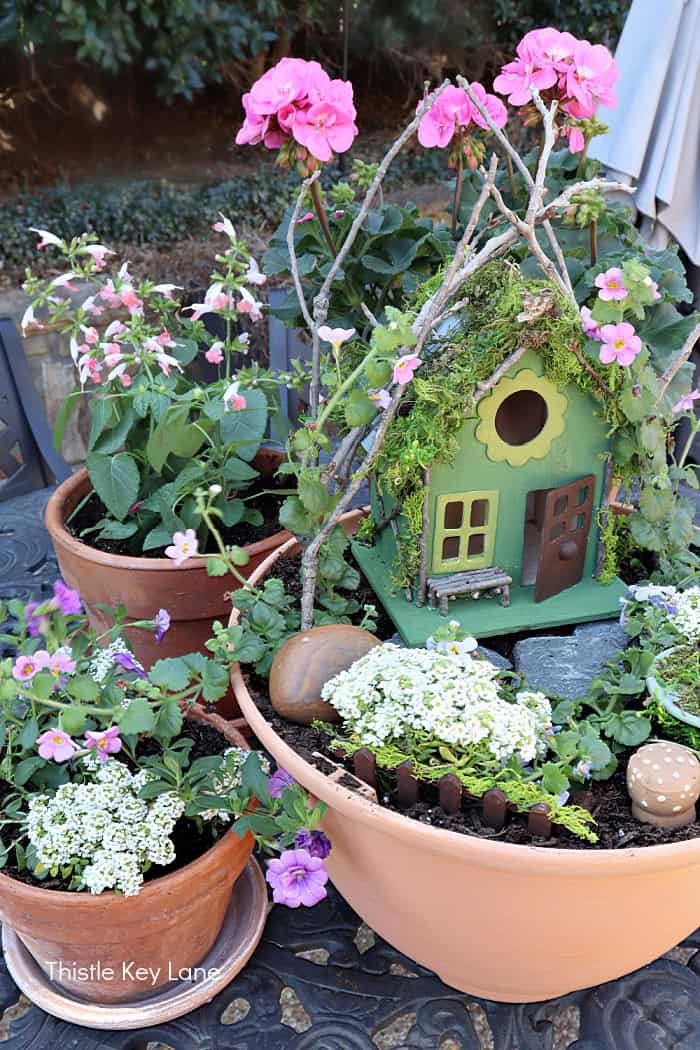
To create a fairy garden in the flower pot, I’m starting with a cute little bird house. I’m making a few modifications such as removing the fence and door then enlarging the door opening.
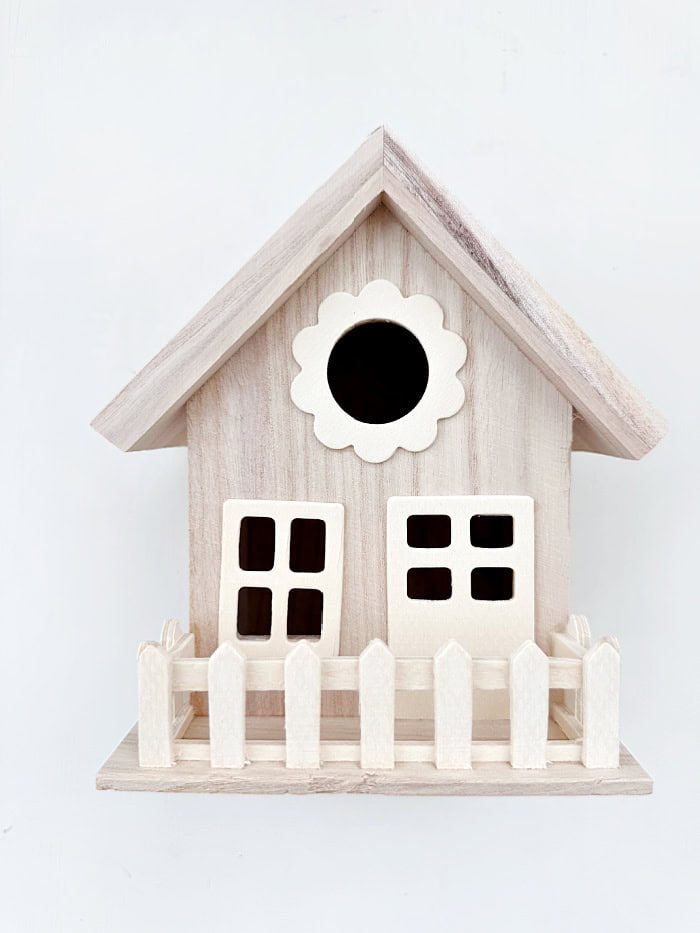
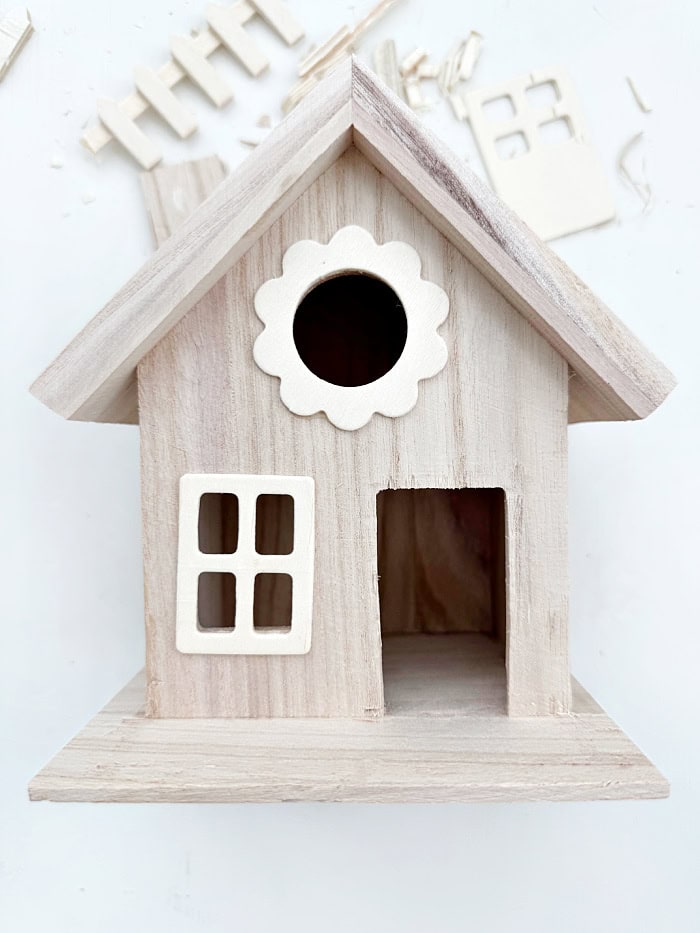
Next step is picking out a color to paint the bird house, that will blend in with the plants. So green craft paint in contrasting colors it is, plus slate gray for the roof and brown for the door.
I wanted to create hinges for the door, but that was going to require too much time. So I glued the door in place, so it will stay open. More inviting that way, don’t you think?
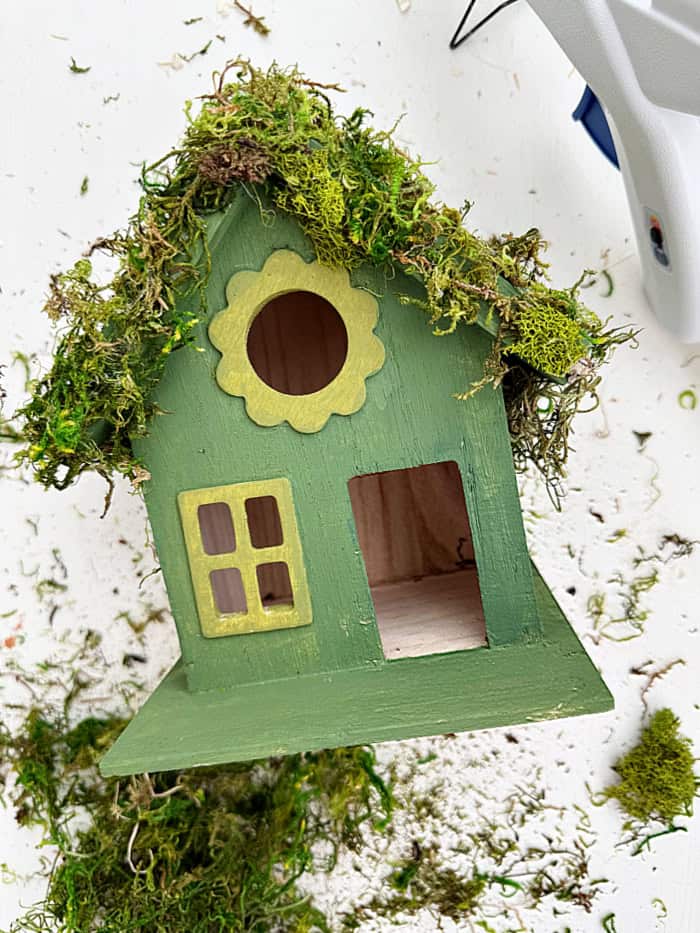
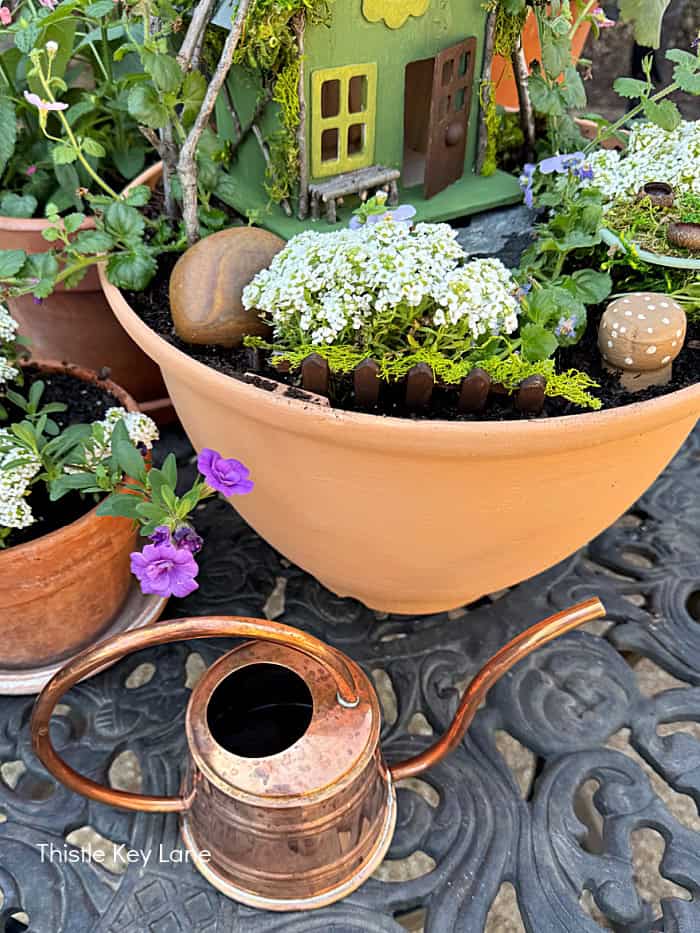
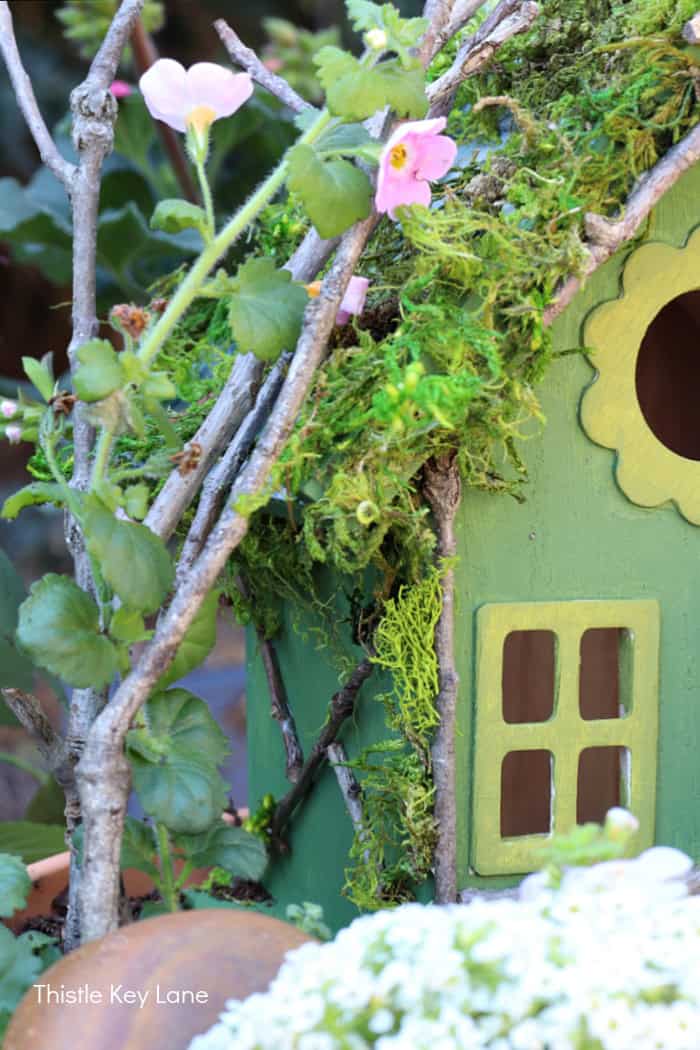
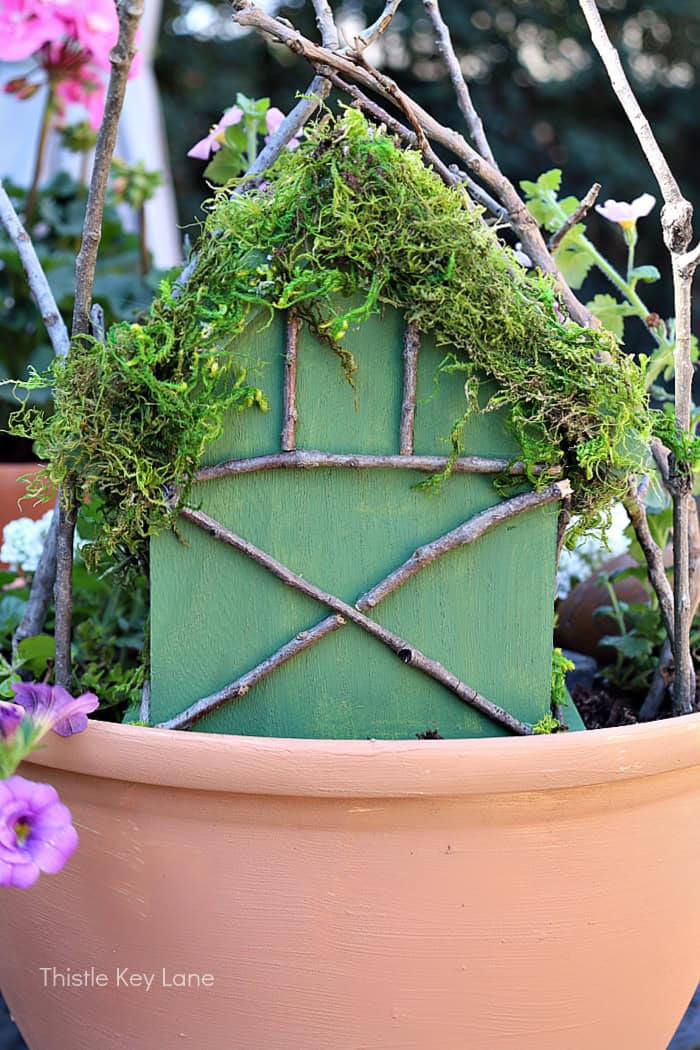
Adding the moss, bit of tree bark and twigs is probably my favorite part of the whole project. This is when the house really takes on a personality of it own. I enjoy adding details with twigs and moss to the sides and back of the house. Don’t you love the wee bench under the window? It kind of cracks me up a bit.
By the way when hot glueing your moss and sticks into place, I recommend using silicone finger protectors. You will find the ones that I like here.
Fairy Garden Furniture And Flowers
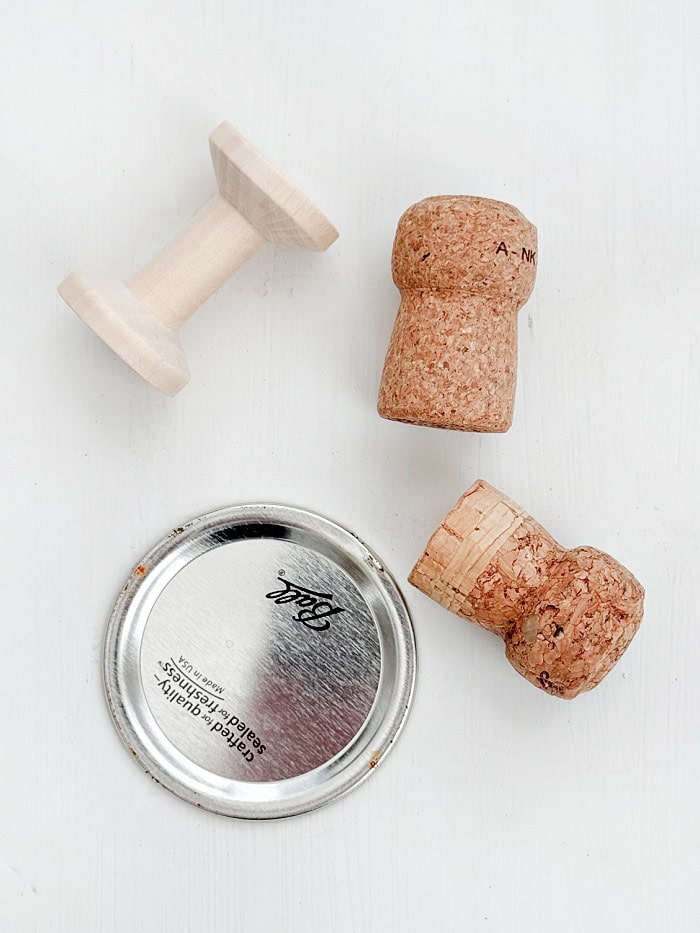
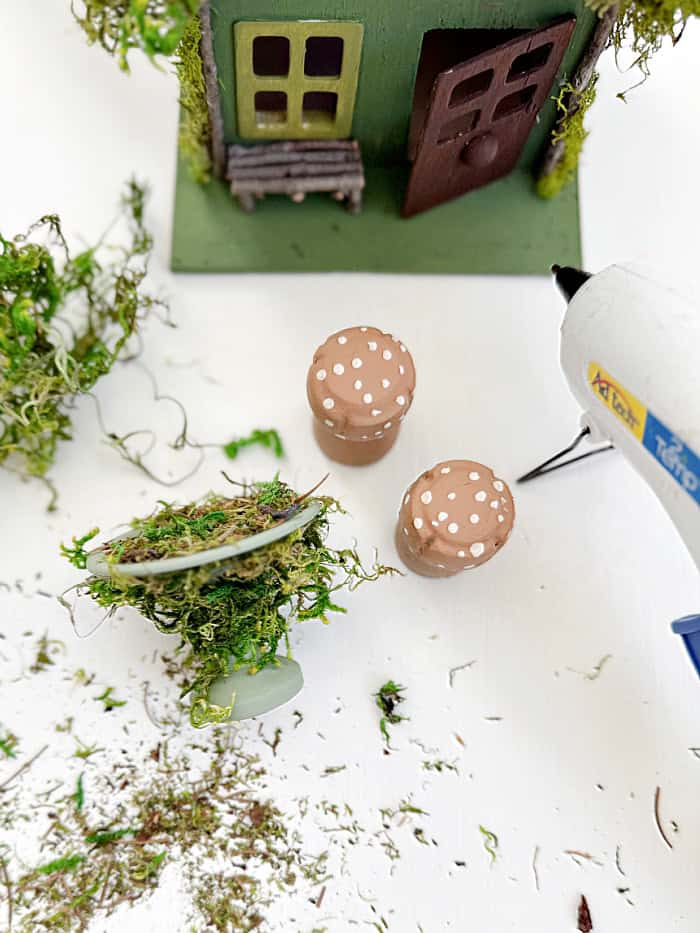
I want this fairy garden retreat to look inviting to any passing fairies, so I’m creating a spot to rest. A jar lid and a wooden spool becomes a table by hot gluing the pieces together, then painting and gluing on more moss. The stools are champagne corks with light brown paint to resemble mushrooms. Of course we have to have acorn cups too.
When assembling your fairy garden be sure to allow space for your house while planning out where the flowers will go. After adding fresh potting soil, I’m planting white alyssum and bacopa with pink and blue blooms. These are sun loving flowers, that may look delicate, but will do well through summer. As the weather warms up the ground cover should fill in around the empty spaces.

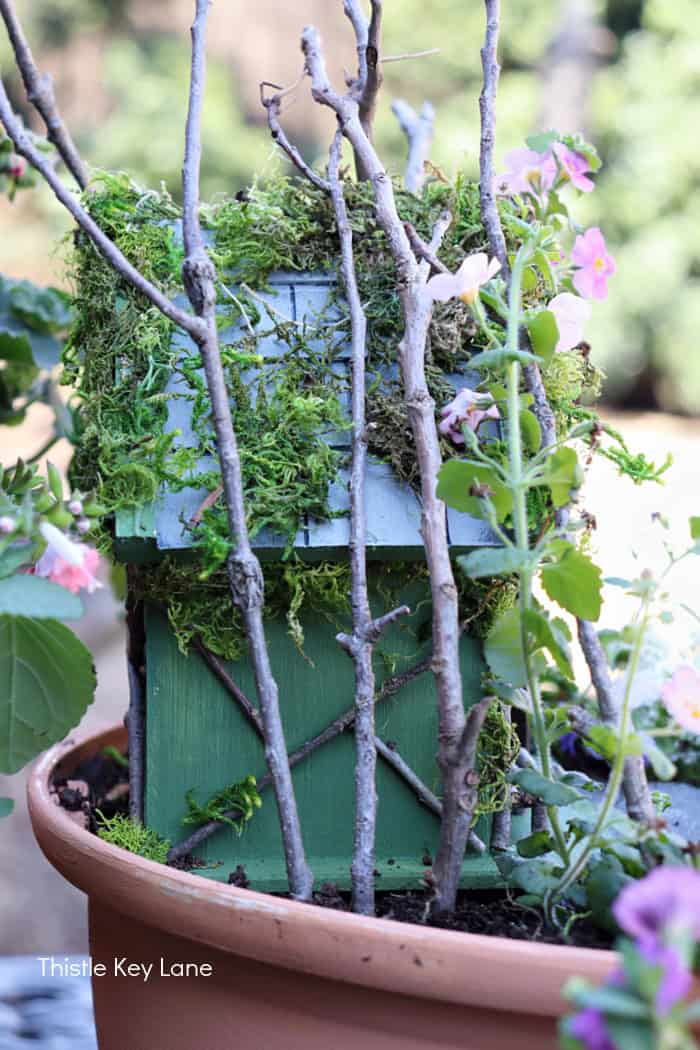
Once the house, rocks, furniture pieces and flowers were in place, I framed the house with larger sticks on each side. These sticks will help to keep the house in place depending on the weather. The only thing missing is a sign that says, “Move-In Ready”. 😉 For more patio planting ideas chick on my post here on how to create a fence herb garden.
Be sure to follow Thistle Key Lane on Pinterest, where the boards are up to date with seasonal inspiration you can use right now!
Thank you so much for stopping by today. Keep scrolling to see what my Handcrafted Society friends are sharing today. All you have to do is click on the image or blog name to view their full post.
Cheers! 


Oh my it is all sooo adorable! But those champagne cork mushrooms!!! You always have the best ideas and doe so thoughtfully. I absolutely love this.
Thank you Diane! Good thing I saved a bowl full of corks!
I just love how your creative brain works, Michelle! This is adorable and such a clever use for garden pots. Well done!
Thank you Missy! This was such a fun challenge this month!
Hi Michelle, I absolutely adore this project! Your fairy house is so cute. I can’t get over what a difference adding moss and twigs makes! And that bench, table, and mushroom stools add the perfect touch! Pinning now so I can try to recreate this sometime!
Thank you for pinning Donna! I love moss projects!
Your fairy garden is so cute. I love that you used an old flower pot as the base. I especially love the mushrooms that you made out of champagne corks – genius!
Thank you Lynn! I’ve never made a fairy garden before, but I sure enjoyed it!
Michelle, this is just adorable. I love the easy peasy pot makeover, and the birdhouse is adorable. I love that you left the door open to welcome all the faires and how you decorated it with the twigs and branches- so clever.
Thank you Wendy! You picked an excellent challenge for us this month!
Your fairy garden is adorable. A pretty whimsical touch to the outdoors area.
Thank you Tammy! Our yard needs a lot of work after the winter we had, but at least the patio table looks good! 😉
I love thus!! I have been wanting to make my own fairy garden for years now. I never even thought of using a bird box, such a great idea!!
Thank you Natasha! This is my first time to create a fairy garden, and was much easier than I expected. I hope you will have fun making one too!
Michelle, this is the sweetest. Green is my color so I am in love with your little fairy house.
Green goes with everything! Thanks Amy!
What a delightful and inspiring project! I love how you transformed an old flower pot and a simple birdhouse into an enchanting fairy retreat. The details with moss, twigs, and tiny furniture really bring the magic to life—especially the champagne cork stools! 😊🌿✨
Thank you Anna for the sweet comments! Hugs!