Today I’m sharing three ways to style a boxwood wreath for summer. I’m also sharing how to make a mini wreath using an embroidery hoop with fresh boxwood clippings.
As an Amazon affiliate, I earn from qualifying purchases at no cost to you. My blog may contain other affiliate link as well for your convenience. For more information please see my disclosure page.
July Pinterest Challenge
It’s time for our July Pinterest Challenge, and this month we are creating or sharing how we style summer wreaths.If this is your first time to join us for a Pinterest Challenge, this is how it works. Our host Cindy over at County Road 407, selects a photo for us to recreate, and each participant puts their own spin on the photo.

The best part is seeing how everyone interprets the image, and we always have an interesting variety. Be sure to click through all the links at the end of my post.
To see last July’s Pinterest challenge, click on my post Grilled Peach Crostini Recipe.
If you’re popping in after visiting my friend Laura of Decor to Adore, welcome to Thistle Key Lane. I’m so happy you’re here!
Our inspiration this month comes from Courtenay of The Creek Line House. In this inspiration photo Courtenay gives us a view of a beautiful fresh boxwood wreath she created for her side porch.
Instead of recreating the inspo photo we are sharing how we style and display boxwood or other types of summer wreaths.

Three Ways To Style A Boxwood Wreath For Summer
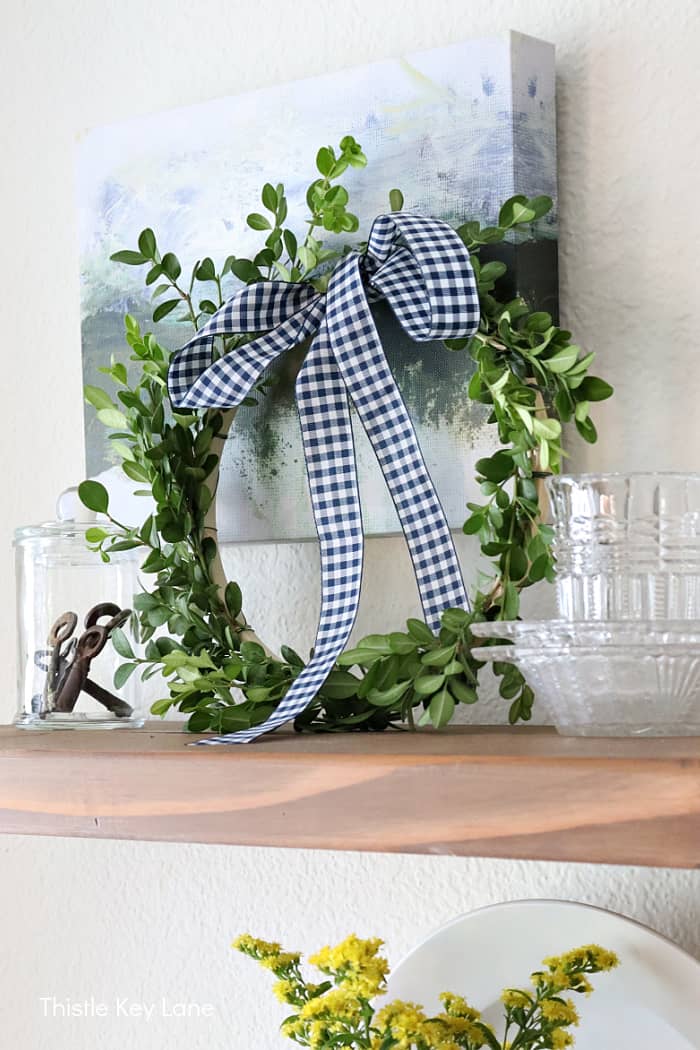
In this post I have an easy boxwood wreath tutorial on a much smaller scale than Courtenay’s, and will share how I’m displaying it on a shelf. I’ll also show two simple ways of displaying preserved boxwood wreaths that look fabulous any time of the year.
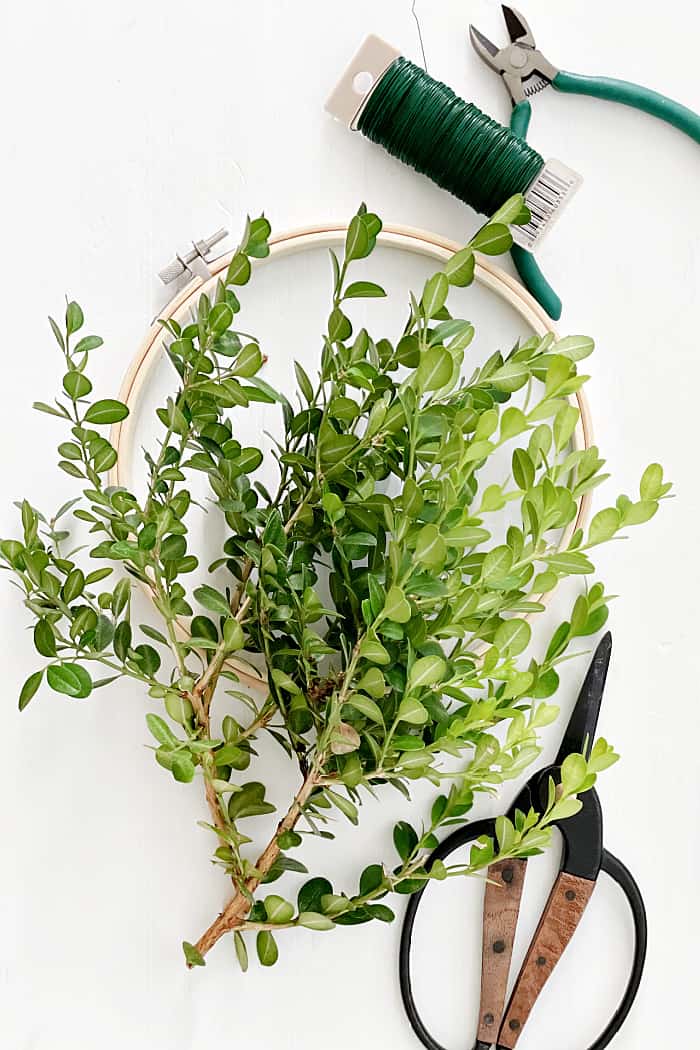
Luckily we have a couple of boxwoods growing in our front yard, so I clipped a couple of short branches to use for this project. By the way this is my first time to make a fresh boxwood wreath, and I’m very happy with how it looks. I know if I can do it, you can too!
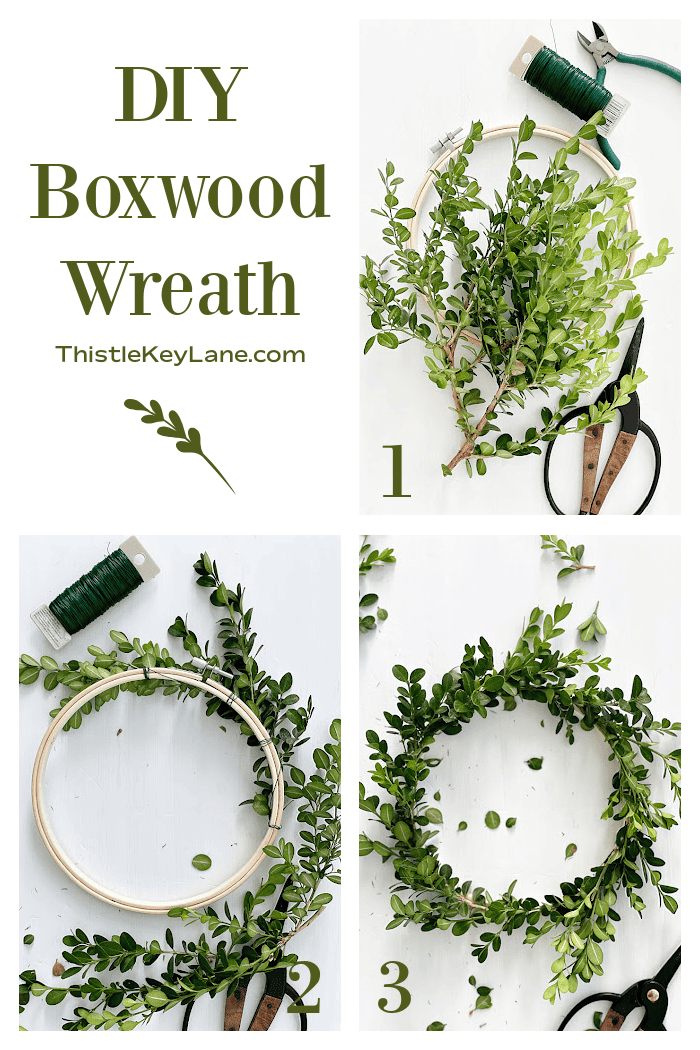
Supplies
- boxwood clippings
- embroidery hoop
- florist wire
- wire cutters
- ribbon
- I’m using an embroidery hoop as my wreath form for this project. I want a wreath that is small enough to sit on a shelf, so I’m using an 7″ size embroidery hoop, however you can make one any size you wish.
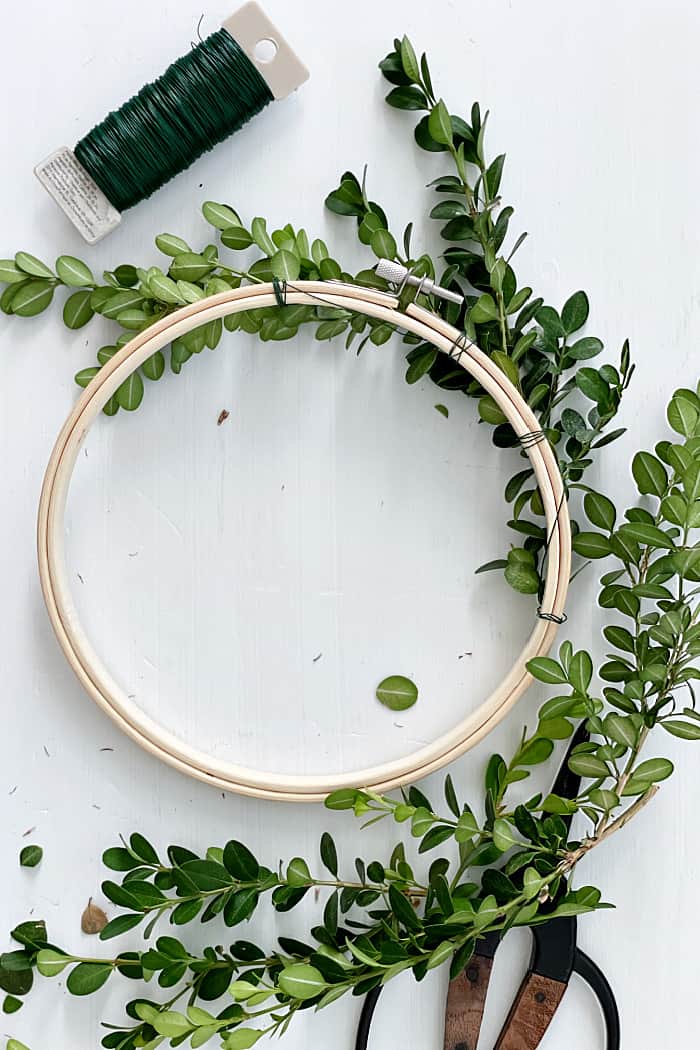
- First trim off short stems from your larger branches, then when you have enough you can start making your wreath.
- Take one or two stems at a time and hold them in place on the embroidery hoop while securing the stem with florist wire.
- Repeat this process until you have enough to cover the hoop. If you have stems that are sticking out too far or at weird angles use your clippers to trim them back a little.
- The final step is to add a ribbon for decoration or use a ribbon as a hanger.

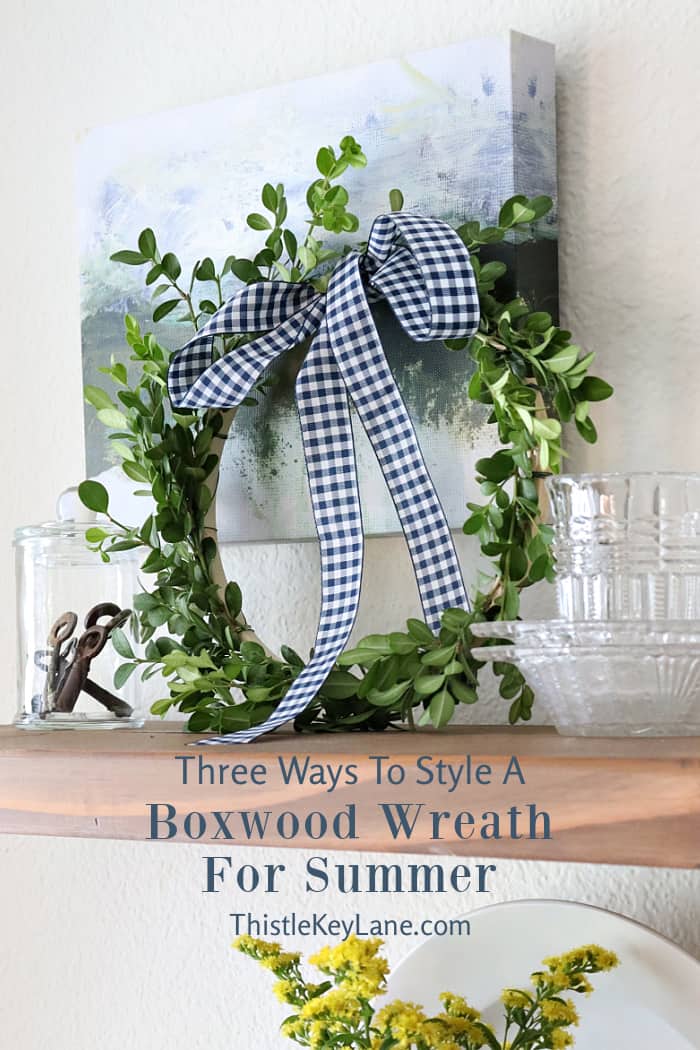
Styling A Fresh Boxwood Wreath
One thing I love about my open shelves off the kitchen is that they are so easy to change up with seasonal accents. I’m using my fresh boxwood wreath on the top shelf to add a punch of green instead of using a plant.
The navy ribbon looks so summery, and of course the classic gingham pattern never goes out of style.
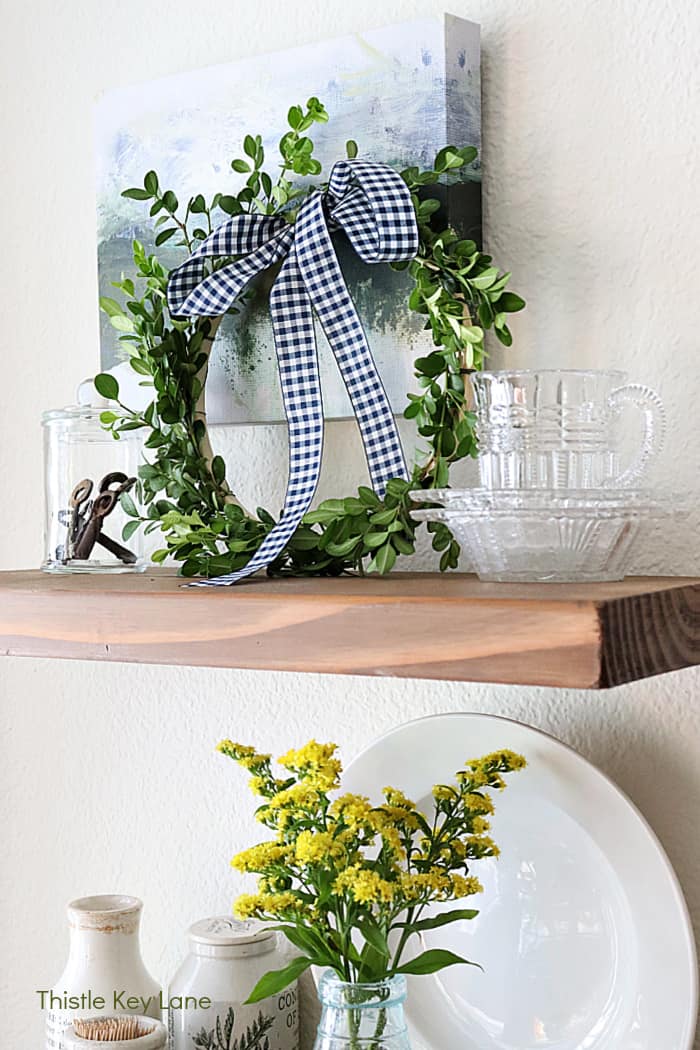
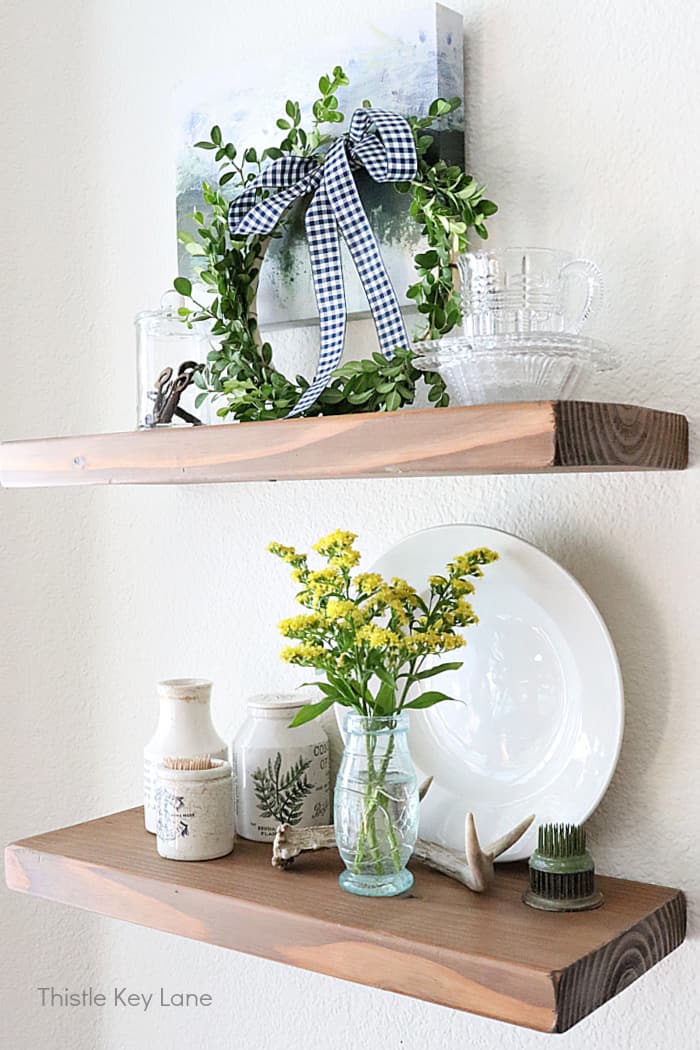
After displaying the fresh boxwood, I switched a few more things around on the shelves for a late summer look. I love the look of these vintage pressed glass pieces along with the ironstone jars and a pretty French vase.
Preserved Boxwood Wreath
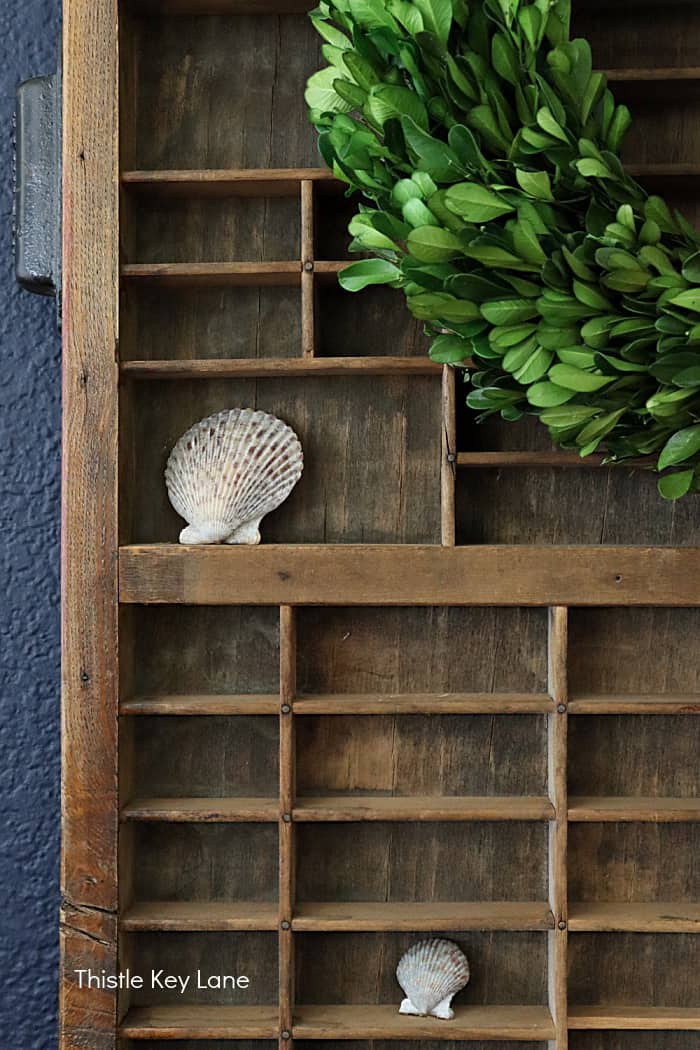
I never seem to get tired of preserved boxwood wreaths and enjoy finding new ways to decorate with them from season to season. Right now I have one hanging on a vintage printer’s drawer with ticking ribbon.
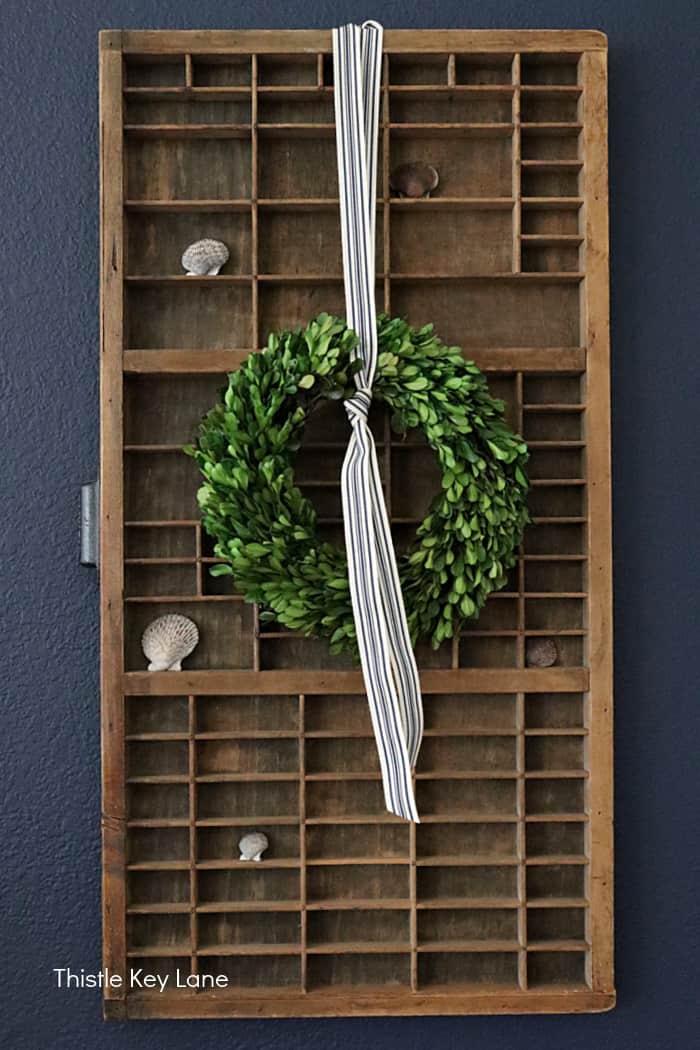
On the top of the printer’s drawer I added a clear command hook so I can loop the ribbon over the hook. Such an easy way to display a wreath and voilà I have a pop of green and a textural element to add to this space.

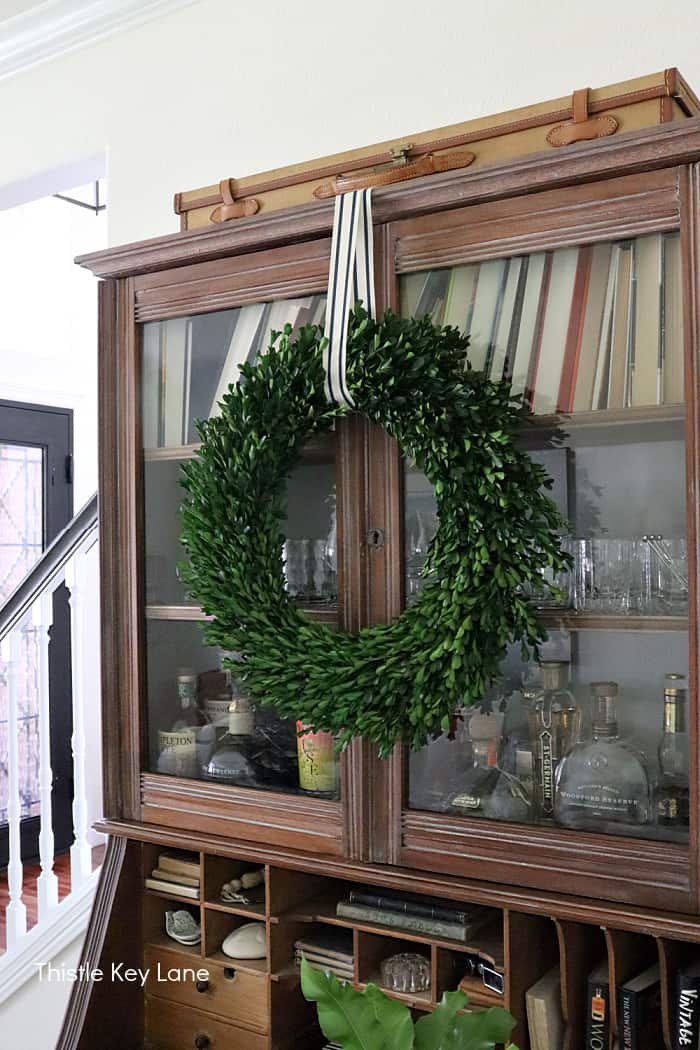
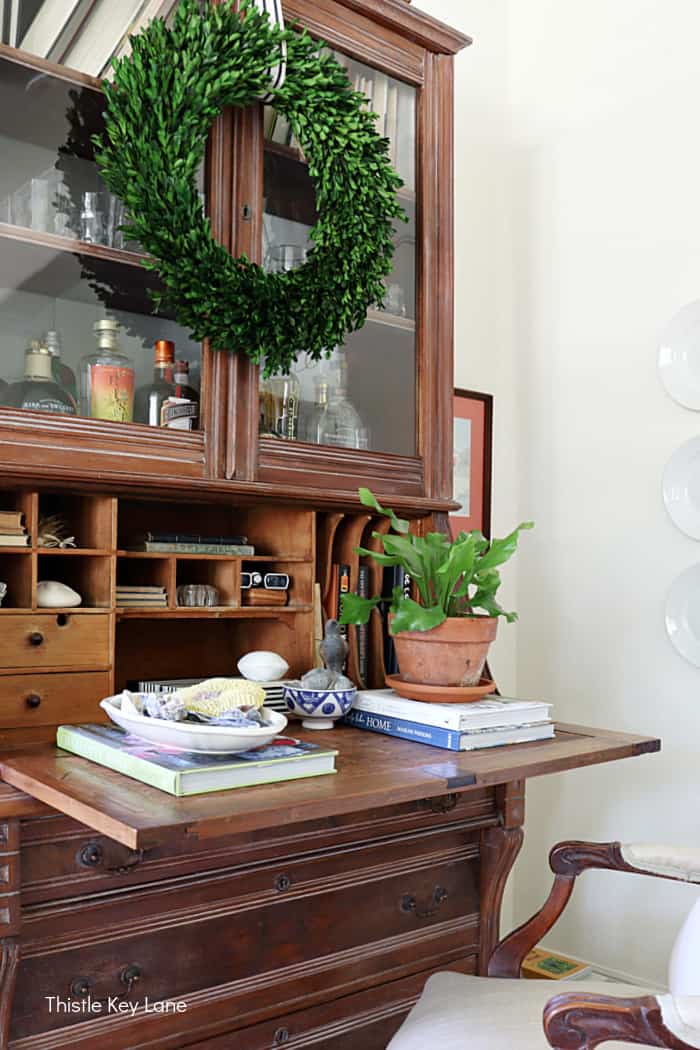
Another idea to try is to display a wreath over a cabinet. The secretary desk in the living room is always a fun spot to try something new.
Using a wider ribbon this time I’m hanging a larger boxwood wreath with a single loop and securing the ribbon on top of the cabinet.
I think the key to changing up the look of a boxwood wreath for each season is type and color of ribbon I decide on. Of course sometimes I like to display them without a ribbon, and allow the surrounding accents to set the seasonal vibe.
Looking for more ways to display a boxwood wreath…
- hutch
- cabinet
- bookshelf
- over a mirror or framed artwork
- over a mantel
- door
- gallery wall
- table top with a candle
Be sure to follow Thistle Key Lane on Pinterest, where the boards are up to date with my favorite seasonal inspiration!
Now it’s time to send you over to Lora of Create & Ponder. I know her summer seashell wreath is going to inspire you as much as it does me!
Be sure to come back to visit all the links below for lots more ideas on summer wreaths. Thank you so much for stopping by today.
Cheers!
More Wreath Inspiration…
©2023 Three Ways To Style A Boxwood Wreath For Summer post first appeared on Thistle Key Lane.

Michelle, you are lucky to have big enough boxwoods out front to gather clippings from! I have two babies and it seems that they don’t get big enough, quick enough, before the Arctic winds and freezes come and kill them to the ground. It’s been tough here in North Texas to get them to grow. I had no trouble in California growing them, lol!
I love how your new boxwood wreath turned out! It’s perfect up on its shelf tied with summer gingham!! Enjoy it!!!
Summer hugs,
Barb 🙂
We planted our boxwoods over 20 years ago. They take a lot of abuse through our Texas summers and winters but just keep going. I’m sure yours will survive too.
Thanks for the encouragement, Michelle! It seems the weather is trying to thwart me at every turn, but we’ve finally figured out how to keep the plants going. A lot more water is needed than I originally thought. ☺️Thanks again!
I LOVE how you styled your wreath. It truly is a versatile accessory. Stay cool!
Thank you Laura!
I love the way you used an embroidery hoop to make a wreath, how fun and creative is that. I also love, love, love the way you tie the different ribbons for different looks on your wreaths too. Gorgeous.
Thank you so much Marty!
Using the embroidery hoop was a great idea! Love the wide ribbon you used, as well! Nice job, Michelle!
Thank you so much Kim!
What a fun Pinterest Challenge this has been!!!
Oh my goodness all the lovely placed you styled your wreaths. They all look so fresh, but I’m particularly taken with your magnificent secretary!
Thank you Diane! The secretary is one of my favorite spots to experiment and decorate!
Your wreath turned out beautifully and I love that bow. I wanted to make a fresh wreath but the mister would have had a conniption. He likes his boxwoods. LOL! Thanks for joining in. Love how you styled your wreaths too. Just can’t go wrong with boxwoods.
I have to tell you I was shocked when the Mister said I could cut on the boxwoods. A couple of snips off the back and no one can tell. 😉
Great idea to use an embroidery hoop as a wreath form, Michelle. Absolutely love all the places you thought of to hang the wreaths! I’m partial to the printing drawer, though. Just love hanging wreaths on something architectural like that:)
Thank you Lora! Hey great minds think alike LOL!
I love all your ideas Michelle! I agree that the ribbon is a great way to change the look or vibe! Your fresh boxwood wreath is so charming with the gingham ribbon, and I love how you displayed it on your kitchen shelf!!
Thank you so much Cindy!
Oh my goodness, I love these boxwood wreath ideas. So pretty.
Thank you Renae!
Your fresh boxwood wreath with the gingham ribbon is beautiful! I love how you styled your wreaths with the different ribbon. They all look so pretty! It is always fun to hop with you, Michelle!
Thanks Lynne! Another fun Pinterest Challenge for the books!
Such pretty styling ideas, Michelle!
Boxwood wreaths never got out of style and are just timeless. I love how you draped it over that lovely printer’s drawer! Thanks so much for sharing at Home Imagined this week!
I finally made it to the party!! Yay!
Michelle, don’t forget to join us over at the Creative Crafts Linky Party every Wednesday through Sunday
https://creativelybeth.com/creative-crafts-linky-party/
Followed and Pinned!
Creatively, Beth
Thanks for the invite Beth!!
Michelle I love the boxwood wreath with the gingham ribbon, so perfect for summer 🙂
Thank you so much Tanya for visiting today!
I love your boxwood wreath, Michelle. It turned out beautifully!
Thank you Jen for stopping by today!
Love this post Michelle, I’m going to share it in a round up of summer wreaths this Saturday. Hope that is ok with you.
Thank you Ann that would be wonderful! I’ll be sure to check out your post! Happy Summer!
Always love anything boxwood! And I love your tutorial and styling tips, too, Michelle! I’m delighted to be featuring your post this week at Tuesday Turn About!
How sweet! Thank you so much Julie for the feature! I’ll be by today to share a couple of new posts!