I’m finally finishing up a DIY aging terracotta pots project, that I started several weeks ago. After using these mini pots in a recent post I thought, they look alright, but what I really want is a more realistic aged patina. If you’re looking for a fun project and don’t mind getting your hands dirty, keep scrolling for details.

DIY Aging Terracotta Pots
The terracotta pots below were haphazardly painted. That is, until I sanded most of the paint off while prepping for a photo shoot. To see the sanded down look check out the post Garden Tablescape With Herbs.

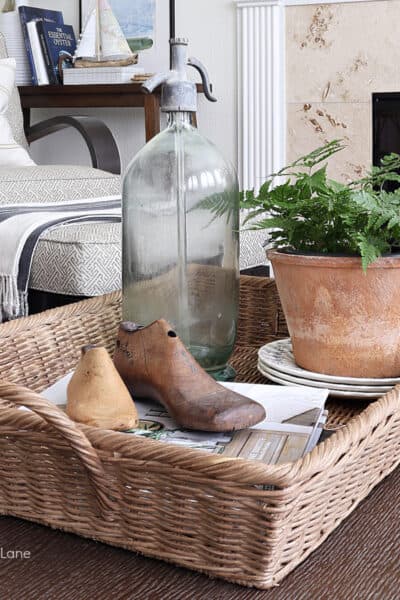
I have several large clay pots that have aged beautifully over time. They’re chipped, coated in areas with mineral deposits and discolored from soil making them all the more interesting to me. I love using these bigger clay pots in photo shoots, so naturally they became my inspiration for this little project.
My best tip when aging more than one terracotta pot, is don’t make them all look alike. They will have a more collected look if some are more aged than others.
Supplies
- mini terracotta pots
- acrylic or chalk craft paints
- chip brush or craft brush
- sanding sponge or sand paper
- scrap cardboard for a work surface
DIY Aging Terracotta Pots
To achieve this look, use chalk or acrylic paints in a matt finish or a combination of both. Pick colors in white, green, taupe, brown, orange or red.
- Start by painting a little bit of white paint on the bottoms of the pots and on the rims in spots. A chip brush works well for this project. Allow the paint to dry.
- For darker shading I suggest mixing paints on your cardboard before applying sparingly. Don’t forget to add paint to the inside as well. To create a dried moss effect add a bit of green paint on a few of the pots on the base or under the rim. Allow the paint to dry.
- When paint is dry, sand painted areas as needed to blend and soften the colors.

If you want to take the process one step further smear mud around eat terracotta pot for a natural looking time worn patina. All it takes is about a quarter cup of clean soil and a little bit of water. Let the soil dry completely, then wipe off as much or little of the dirt you want.

Dried soil is easy to remove by wearing garden gloves, although a paper towel will work just fine. If you remove too much soil repeat the process.
I can’t wait to use these little beauties in an arrangement or vignette and will share them when I do.

Be sure to follow Thistle Key Lane on Pinterest, where the boards are up to date with seasonal inspiration you’re going to love!

Thanks for stopping by and letting me share my aging terracotta project with you. Let me know when you give this one a try.
Cheers!
©2020 DIY Aging Terracotta Pots post first appeared on Thistle Key Lane.


These look so authentic! Pinning for future, because awhile back I needed pots like this for a pre-wedding dinner. I just chalked them, and everyone thought they looked great. But this is more permanent. Love it.
Thank you so much! I’m so happy with how they turned out and ready to make more.
Love this Michelle!! I’m getting ready to age some pots myself in a couple of weeks. I am using organic fertilizer and water.
If I don’t like it I am going to give this a try.
Thanks for the share!!
Happy May!
Cindy
Thanks Cindy, I’ve heard of using lime but not fertilizer, so this sounds very interesting.
PINNED!
Thanks Cindy!!
These look fantastic, Michelle! What a great project to take on!
Thank you Janet, I hope to use them on more tablescapes and in seasonal vignettes.
Such a great tutorial, Michelle! I have a real soft spot for aged terracotta. In fact, I’ve recently added two smaller pots to my small, but growing collection. I’ll be pinning this for future reference!
Thank you so much Candace for pinning! I would love to add a few more to my collection as well.
The terra cotta pots are amazing, I also Like to use terra cotta for spring. Thank you for sharing this great idea.
Thank you Vicki! I love their rustic garden appeal.😊