


Today I’m sharing how to make bird trinket dishes with air dry clay. You’ll also see several examples of how to paint your air dry clay dishes with craft paint creating simple patterns.


This post may contain affiliate links. Please see my disclosure page for more information.
It’s the first Tuesday of the month, which means it’s time for our Handcrafted Society get together hosted by Wendy of WM Design House. What is the Handcrafted Society? Simply put, it’s a group of bloggers who share a love for handcrafted items.
Our challenge each month is to take an assigned medium or theme and create whatever our heart desires. We are also inviting a guest to join us each month. How fun is that?! We’re happy to have Tammy of White Lilac Farmhouse join us today.


For our April challenge, we’re creating spring projects with air dry clay. If you’re coming over from WM Design House welcome, I’m so happy you’re here. I’m sure you’ll agree Wendy’s clay rabbits and carrots are pretty darn cute!
To see last month’s HS post click on Wooden Keepsake Easter Eggs.

Bird Trinket Dishes With Air Dry Clay
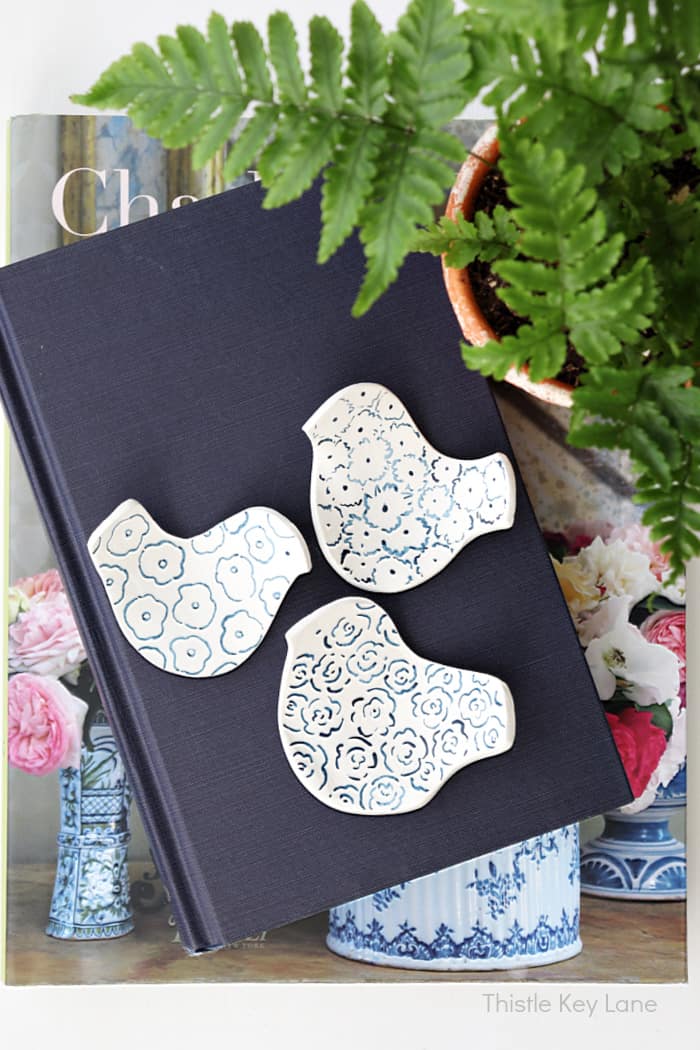
To celebrate spring I’m making bird trinket dishes with air dry clay for our HS challenge. I’ll show you two different ways to make them and simple patterns to add with craft paint.
I have a love for birds especially in the spring. My studio windows look out over the backyard and there’s always lots of activity with birds and squirrels coming into the feeders.
The most impressive birds are the hundreds of Goldfinches that migrate through each spring. They devour the red berries on our holly bushes, and within a couple of days they are gone.

If you’re a novice like I am, then making trinket dishes is a fun way to learn how to work with clay. Let’s get to it!
Supplies
- white air dry clay
- assortment of clay tools
- glass bottle or acrylic roller
- sponge and water bowl
- plastic bag with zip closure
- paper and scissors
Instructions for Bird Trinket Dishes
- First create a simple bird pattern that you can use as a guide. There are lots of images on line or you can create your own.
- Cut off a small amount of your air dry clay from the package of clay and roll it into a ball. (Be sure to store your clay in an air tight plastic bag to keep it soft and moist.)
- Place clay on an acrylic board or work surface, and roll out the clay with an acrylic rolling pin or a smooth glass bottle to your desired thickness.
- If you need help rolling out your clay to an even thickness, place a small dowel or pencil on each side of your board as a guide.
- Cut out your bird shape with a small knife or cutting tool.
- Carefully lift the clay bird off your board, so you can clean up the edges. I like using my fingers to clean up the edges. (Save the leftovers in a plastic bag for your next project.)
- Keep a wet sponge in a bowl next to your work area, so you can dampen your fingers with water to smooth out the clay or fix imperfections.
- To create a curved shape to your dish, place the clay bird in a bowl or drape over a rounded object. Sometimes I use a large plastic egg or a styrofoam ball to get the shape I want.
- The clay birds I have are thin and easily dry in 24 hours. If you make thicker ones you many need to let them dry several days.
- Once the dish is dry use a piece of fine sand paper to smooth the edges. Decorate as you desire.


Painting Air Dry Clay
For this project you’ll need acrylic craft paint in navy blue and a number 1 size craft brush. In a bowl or plastic container add a tiny amount of water to your craft paint. Practice on paper first and decide on what patterns you want to create.

I love creating monochromatic designs. I also love navy and indigo, so that’s my inspiration in decorating my bird trinket dishes.
Simple designs are the easiest to apply especially since I’m working on a small curved surface. Each dish is a different size and design, so I can display them together in a stack or in a grouping.

Bird Trinket Dish With A Base
Now if you want to take your project one step further, create a base or foot on the bottom. Make a ring shape out of clay to add to the bottom side. Use your fingers and a wet sponge to blend and smooth the pieces together.


Allow your dish to dry then use a piece of sandpaper to smooth out any rough areas or imperfections.
For this bird dish I created a pattern with dots using the blunt end of the craft brush handle. Just dip the handle into the paint and create dots until you need to dip again. I think the random size of the dots makes the pattern look more interesting.

If painting is not your thing you can always paint each bird a solid color. It’s your project so make it your own.
I should also add that you may want to seal your trinket dishes once complete. If you’re looking for a high gloss finish try Triple Thick Gloss. For my trinket dishes I went with a matte finish using Mod Podge Satin Spray.

Shop supplies
- air hardening modeling clay
- acrylic roller and board
- 12 pc clay tool kit
- 35 pc clay took kit
- acrylic spray sealer clear
- brush on glass glaze
Be sure to follow Thistle Key Lane on Pinterest, where the boards are up to date with inspiration that you can use right now!

Up next is Amy of Amy Sadler Designs sharing her clever technique of aging and decorating terra cotta pots. You will love them!
Thank you so much for visiting today! Be sure to continue clicking through all the links below to see the fabulous projects from my friends.
Cheers!


Handcrafted Society – Air Dry Clay Projects


